|
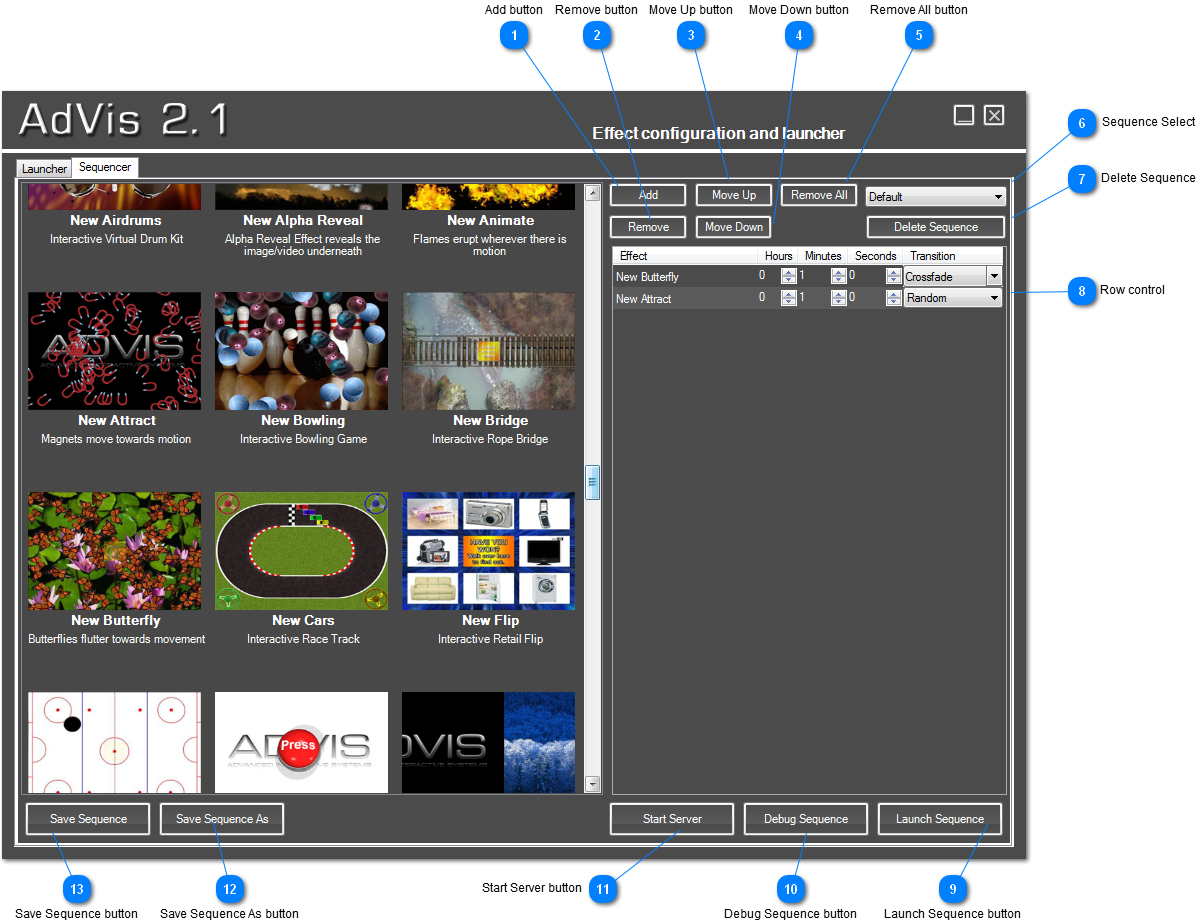
The Sequencer can be accessed by clicking on the sequencer tab at the top of the AdVis main window, or by clicking ‘Open Sequencer’.
You have a list of all your effects on the left, and your custom sequence on the right. You can add effects to the sequence by either double-clicking them, or selecting them and clicking ‘Add’. You can remove effects from the sequence by clicking ‘Remove’ or change the position of the effect using ‘Move Up’ and ‘Move Down’. Each effect can be setup to run for a certain duration before moving on to the next effect simply by changing the duration values.
You can also save and load custom sequences by using the buttons at the bottom. To launch the sequence click either ‘Debug Sequence’ or ‘Launch Sequence’. To quit the sequence press the Escape Key.
You can change sequencer settings in the AdVis Configuration such as the background image and time between effects and whether to start the Sequence automatically when Windows Starts.
 Add button
Adds the currently selected effect into your playlist.
| |
 Remove button
Removes the selected effect from the playlist
| |
 Move Up button
Moves the selected effect up the playlist.
| |
 Move Down button
Moves the selected effect down the playlist
| |
 Remove All button
Removes all the effects from your current sequence.
| |
 Sequence Select
Lists all your saved sequences stored in the Sequences folder
| |
 Delete Sequence
Deletes the currently selected Sequence from the Sequences folder.
| |
 Row control
List of effects currently in your playlist. You can change the duration the effect will run for and a transition when moving to the next effect.
| |
 Launch Sequence button
Starts your playlist in normal tracking mode. Press Escape key to exit the sequence
| |
 Debug Sequence button
Starts your playlist in mouse mode. Press Escape key to exit the sequence
| |
 Start Server button
If this installation of AdVis is being used as a master server for other installations to update from, when you have set up your effects and sequence, click Start Server. AdVis will listen for any incoming connections and update AdVis clients accordingly.
| |
 Save Sequence As button
Saves the current sequence under a new name. Make sure you save the sequence in the 'Sequences' folder. New sequences will appear in the Sequence Drop Down List.
| |
 Save Sequence button
Saves the currently selected sequence.
| |
|
|