|
The Animate effect supports an unlimited amount of interactive layers. Too add a new layer, just click the add button. Then browse for your image containing the animation frames or the first file in your image sequence. See ' Animated Sprites' for more information.
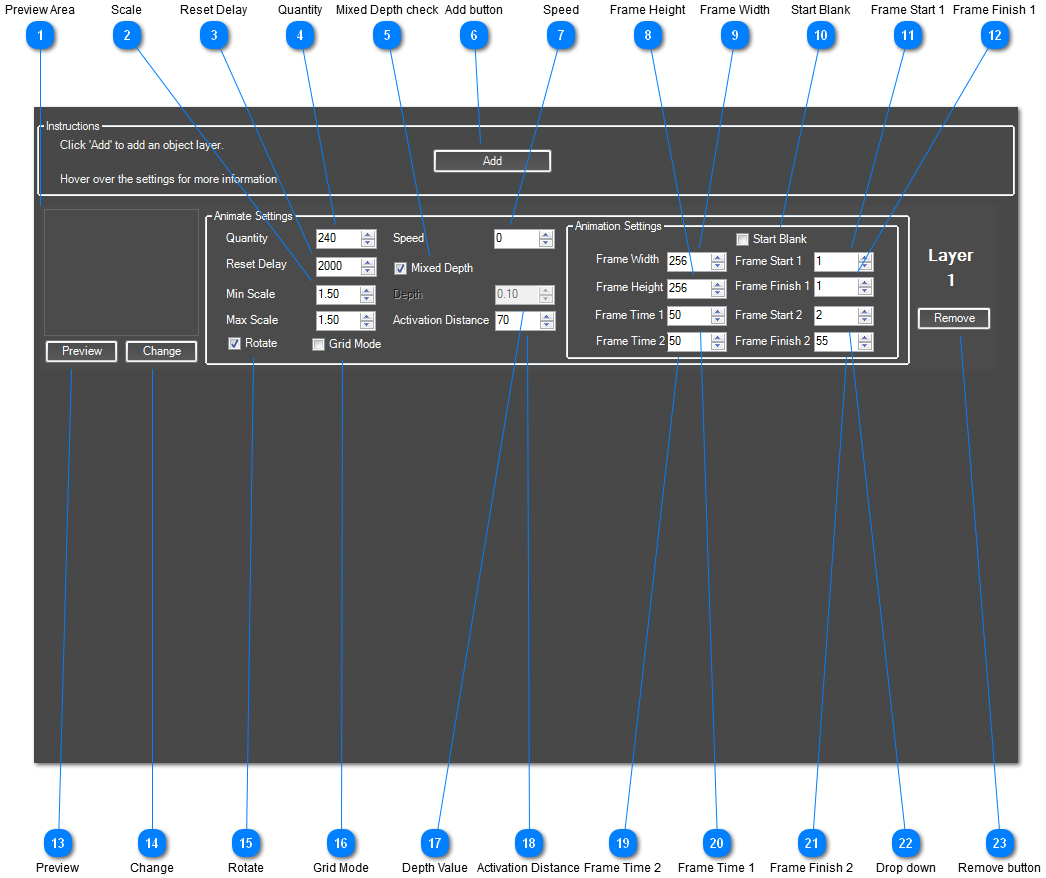
You can see details of all the possible settings below.
 Preview Area
This is where you can preview your animation.
| |
 Scale
Set the minimum and maximum scale values and AdVis will create copies of your animation with random scales between these two values. A scale of 2.0 will double the original size of your image.
| |
 Reset Delay
This is the delay after your animation has finished before it is reset back to normal and can start detecting motion again.
| |
 Quantity
Set how many copies of your animated image are displayed across the screen.
| |
 Mixed Depth check
If enabled, this layer will be mixed with all other layers. If disabled, layers will be drawn on top of each other i.e. images in Layer 1 will be shown beneath images in Layer 2. If mixed depth is enabled Layer 1 and 2 will be mixed together.
| |
 Add button
Adds a new Animate layer to your effect.
| |
 Speed
If set to 0, the images will stay in the same place. If you increase this the images will move randomly around the screen. This higher the setting the faster it will move.
| |
 Frame Height
If you are using a single image that contains all the frames in your animation, this is the pixel height of each frame in your image. See 'Animated Sprites' for more information on setting up an animated Sprite.
If using a file Sequence, this option is disabled.
| |
 Frame Width
If you are using a single image that contains all the frames in your animation, this is the pixel width of each frame in your image. See 'Animated Sprites' for more information on setting up an animated Sprite.
If using a file Sequence, this option is disabled.
| |
 Start Blank
If enabled, the animated sprite will not be visible until motion is detected.
| |
 Frame Start 1
If 'Start Blank' is disabled, you can have an animation that runs while there is no motion. This is the frame number for the beginning of the animation loop that you want to run when nothing is happening. If you just want to show a single frame, make sure Frame Start 1 and Frame Finish 1 are the same.
| |
 Frame Finish 1
If 'Start Blank' is disabled, you can have an animation that runs while there is no motion. This is the frame number for the end of the animation loop that you want to run when nothing is happening. If you just want to show a single frame, make sure Frame Start 1 and Frame Finish 1 are the same.
| |
 Preview
Hit preview to show the animation that appears when motion is detected and press preview again to show the animation that plays when there is no motion.
| |
 Change
Click here to browse for your image file containing the frames of your animation or the first file in your Image Sequence
| |
 Rotate
If enabled, your animations will be randomly rotated.
| |
 Grid Mode
If grid mode is enabled, instead of the images being placed randomly across the screen, they will be placed evenly in a grid across the screen.
| |
 Depth Value
You can set the depth of this layer. Layers set with a higher depth will be drawn on top of layers with a lower depth.
| |
 Activation Distance
This sets how near motion needs to be to set off the animated sprite. Measured in pixels, the higher this setting, the further away motion will set off the sprite.
| |
 Frame Time 2
Set's how many milliseconds between each frame of your animation after motion has been detected. Increase this setting to slow down your animation.
| |
 Frame Time 1
Set's how many milliseconds between each frame of your animation before motion has been detected. Increase this setting to slow down your animation.
| |
 Frame Finish 2
This is the frame number for the end of the animation loop that you want to run when motion is detected. If you just want to show a single frame, make sure Frame Start 2 and Frame Finish 2 are the same.
| |
 Drop down
This is the frame number for the beginning of the animation loop that you want to run when motion is detected. If you just want to show a single frame, make sure Frame Start 2 and Frame Finish 2 are the same.
| |
 Remove button
This will delete the current layer.
| |
|
|