|
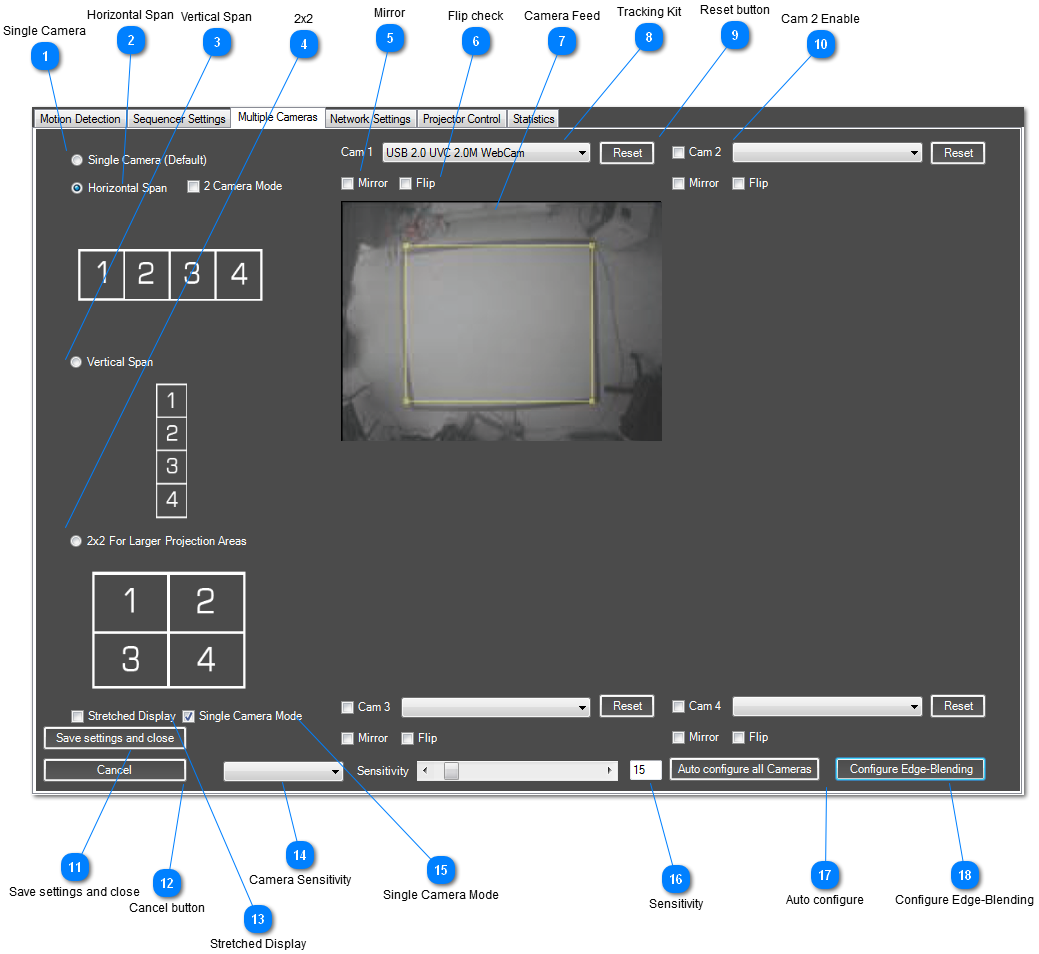
You can configure each camera in exactly the same way as you set up a single camera, and crop the detection area so you can easily match the cameras up. You have the option to have the projectors/cameras vertically or horizontally span (to create long displays, walkways, etc.) or create a very large display using four projectors.
Depending on the mode and amount of cameras you have chosen, effects will run at the correct resolution and the cameras will be aligned accordingly. For example, if you have three cameras setup to run in horizontal span mode and your resolution for the primary display is set at 1280 x 1024 the effects will run at 3840 x 1024 resolution (3 x 1280 x 1024). If you have selected 'Disable Auto Scaling' on the Motion Detection tab, the effect will run at 3072 x 768 (3 x 1024 x768).
Depending on your graphics card drivers, operating system and/or use of additional products such as the Matrox TripleHead2Go Video splitter, Windows may see each display separately, or see it as one large display. If it is seen as one large display, you should enable 'Stretched Mode' to make sure the resolution and tracking calibration is set correctly. Alternatively you can disable Auto Scaling in the motion detection tab to run each display at 1024 x 768.
To begin, choose how the projectors are laid out, then setup a tracking camera for each projector as you would do normally for one projector (unless using Single Camera Mode to use one tracking kit over multiple projectors, in which case you just need to make sure the yellow box covers the entire projection area of the combined projectors).
 Single Camera
This is the default setting. For an interactive system consisting of one display and one tracking camera.
| |
 Horizontal Span
For multiple projectors lined up from left to right. (4 maximum)
| |
 Vertical Span
For multiple projectors lined up from top to bottom. (4 maximum)
| |
 2x2
You can use 4 projectors to create a normal shaped projection area but on a larger scale.
| |
 Mirror
Flips the camera feed Horizontally
| |
 Flip check
Flips the camera feed vertically.
| |
 Camera Feed
There is a preview for each camera you have selected. The yellow box has the same function as the yellow box on the Motion Detection tab. You need to drag the corners to corresponding corners of each projected image.
| |
 Tracking Kit
Lists all currently connected tracking kits. You need to select the tracking kit that corresponds to the correct camera/projector position.
| |
 Reset button
Resets the yellow crop box for this camera feed.
| |
 Cam 2 Enable
You can enable/disable the additional tracking kits that make up your projection area. You can see which camera corresponds to which projector position by the diagrams on the left.
| |
 Save settings and close
If you are happy with all the settings, click here to save them and close the Configuration Dialog.
| |
 Cancel button
Click 'Cancel' to close the dialog and discard changes.
| |
 Stretched Display
Certain display drivers such as nVidia in XP and products such as the Matrox DualHead2Go and TripleHead2Go will treat multiple displays as one large display. If you are using Auto-Scaling, you will need to run in 'Stretch Mode' for the tracking to correspond accordingly to each display. If you disable 'Auto-Scaling', the effects will run at 1024x768 for each display regardless of how the drivers treat the displays.
| |
 Camera Sensitivity
You can change individual cameras sensitivity by choosing the camera from here.
| |
 Single Camera Mode
If you are using multiple projectors, but are still able to track the projection area with one tracking kit, enable 'Single Camera Mode' to track the entire projection area with just one tracking kit but still use edge-blending features.
| |
 Sensitivity
Adjust the sensitivity setting for the selected camera
| |
 Auto configure
AdVis will iterate through each camera feed and automatically adjust the sensitivity settings. Make sure there is no movement on the projection area.
| |
 Configure Edge-Blending
When you have configured multiple displays, you can launch the Edge-Blending configuration to blend displays together and create a seamless image.
| |
|
|